Ear candles are muslin strips that have been dunked in a very light coating of bees wax, rolled into a long cone formation, and dried. The basic theory is that the cone shape of the candle provides a suction of smoke when the candle is lit, which draws the excess wax out of the ears.
For clean ear maintenance, it is recommended that an ear candling is done once every two months. If you are having problems with an ear infection, ear ache, or swimmer’s ear, it may take up to 3 ear candlings in a row to clear the problem. These can all be done on the same day, or 24 hours apart.
Before starting the procedure, it is best to take a warm shower, or sit in a steam room, as this helps to soften the ear wax you want to remove.
Step 1: Purchase ear candles from your local health food store or online. Most candles are from 8-12 inches long and cost $2 – $4 each.
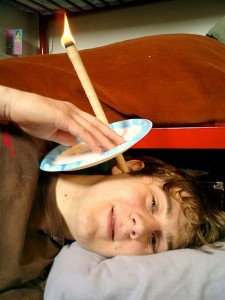
Step 2: Take a paper plate and puncture a small ½ inch hole into the center. Poke the ear candle through the hole until only a 2 inch space remains between the base of the candle and the paper plate. This will act as a barrier between your head and the candle, to protect from any ash that may dissipate from the candle as it burns. Most ear candles don’t produce any ash, but it’s good to use a barrier as a precaution.
Step 3: Fill a glass half way full of water and place it near the location in which the ear candling will be done. (You will place the candle in the glass to extinguish the flame at the end of the procedure.
Step 4: Find a comfortable place where you can lay on your side (either on the floor or on a couch). Pull your hair back into a secure pony tail or use clips to pin it away from your ears.
Step 5: Holding the base of the candle, light the tip with a match or lighter.
Step 6: Lay on your side, and hold the candle at a 90 degree angle to your ear. Position the base of the candle about ¼ inch inside your ear.
Step 7: Allow your body to relax – but make sure to not fall asleep! Hold the candle in your ear until it burns down about 2-3 inches away from the paper plate (approximately 10 minutes). During this time, you will hear a few faint popping noises, and may feel comforting warmth in the ear. This is normal, and is a sign that the wax is being broken up and removed from the ear canal.
Step 8: Once the candle has burned, remove it from the ear and place upside-down into the glass of water to extinguish the flame. Pull it out of the water and cut the base to see all the wax and debris it has pulled from your ear. Doesn’t it feel good to have this junk out of your ear?!
**Some of the ear wax may still remain in the ear canal. Use a damp pointed q-tip or Japanese scoop style ear cleaner to remove the excess. If using a q-tip, be careful to not push the wax further into the ear. Position the q-tip in the upper inside of ear and draw outward, to scoop the wax away from the ear canal.
Step 9: Repeat process on other ear.
Additional Information on Ear Candling:
Some articles online state that ear candling is a “hoax”, and that the gunk inside the candle after the treatment is complete is only the wax from the candle itself. This is simply not true. How to de-bunk this myth? There are two ways. You can burn an ear candle down by itself (putting it nowhere near your ear) and see that once the candle has burned, the inside is completely empty. Alternately, you can make your own traditional ear candle, which involves NO wax at all. Ear candles can be made at home by rolling a piece of news paper into a cone shape, and using a small bit of glue to seal the roll into place. This mimics the shape of a store-bought ear candle, and has the same function. Place the newspaper candle inside your ear, and light the tip. It will burn a little faster than the store-bought candle, but will provide the same results. When you cut the newspaper open at the end of the treatment, you will see all the debris that has been pulled from your ear. Since no wax was coating the newspaper – you have solid proof that the gunk inside actually came from your ear, and not from wax melting off the candle.
Many salons and spas now provide ear candling services, but charge extreme amounts for something you can do at home for a fraction of the cost. Purchasing 2 ear candles usually costs less than $10; but if you go to a salon don’t be surprised if they charge you upwards of $60 for the session.
The truth is, ear candling is a very inexpensive way to solve a common problem. Of course, most doctors do not advocate it because they would rather charge you hundreds of dollars and feed you antibiotics. Some will even try to tell you ear candling is “dangerous”, which is completely ridiculous. The only danger is dropping the candle and burning a hole in your couch, which can easily be prevented with a little caution and common sense. If you are weary that the candles will actually drip wax into your ears, light a candle on its own and let it burn down. You will not see any puddles of wax . If the candle theory still frightens you, use the rolled up newspaper to make your own. Your ears will thank you for performing this refreshing treatment!
The Content is not intended to be a substitute for professional medical advice, diagnosis, or treatment. Always seek the advice of your doctor or other qualified health provider with any questions you may have regarding a medical condition.
does it have any side effects?
Is this method helpful for jaundice treatment also?
Yes it’s very effective in jaundice. Burn two candle cone on each ear. If jaundice is high then try it for 3 days regularly on both ear