Are you looking for the right soap cutter? There are different types of cutters: air soap cutters, manual soap cutters, loaf soap cutters and hand soap cutters. Some just use a butcher knife or chefs knife for cutting through their soaps!
Professional air soap cutters are pneumatically driven. Soap loaves are cut into hundreds of bars in minutes. It cuts hot process and cold process soaps with ease, but not used for melt and pour or glycerin soap. It’s a quiet and powerful soap cutter!
Professional manual soap cutters can cut a large block of soap into perfect sized bar in minutes. It has a manual cutter with a custom designed grid table top for loaves and bars. Cuts cold process and hot process soaps with ease. It’s not used for melt and pour or glycerin soap.
Loaf soap cutters have platform base with custom wire spacing. Just place the loaf on the base, raise the bar handle and the many spaced wires come down to cut the loaf of soap into multiple bars. There is no set up required for this type of cutter. It’s not recommended to use with melt and pour, glycerin soaps.
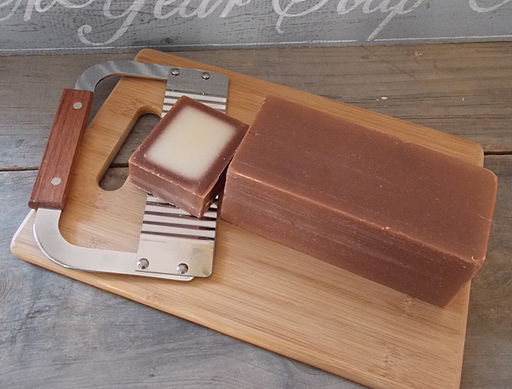
Hand soap cutters come in smooth and wavy, (crinkle cut), blades. They have nice handles to prevent slippage when holding. Their sharp, deep and wide stainless steel blade cuts individual bars from loaves of soaps, easily. These soap cutters can be used with melt and pour, cold process and hot process soaps. They are excellent to use for individual, small or large batches of soap.
Half Round Slicers are available for cutting entire soap loaves or individual soap bars into half moon shapes. No set up is required. Used for newly de-molded soap.
Soap Edgers are used to smooth the corners and edges of soap. A rounded edge is more comfortable for handling. Just glide the soap edger along the soap for a clean professional look. Catch the shavings in a bowl for a no messy clean up. Uses no wires, no need to clean off soap build-up, convenient and easy to use. Some prefer using a soap edger to using a soap beveler or, even, a potato peeler.
Soap Cutter Tip:
Make sure your cutter has a very sharp blade and is able to cut, all the way through, the thickness of your soaps.
Whether you have a soap making business or just enjoy making homemade soap, as a fun hobby, invest in a good soap cutter. It can make a big difference in the appearance of your finished soap products. Using the proper soap making equipment saves you time and money!
The Author
Find a soap cutter, at: http://www.natural-goat-milk-soap.com/soap-cutter.html
How did you make the soap in the picture? With one color on the outside and one in the inside?
Thank you for your question! The soap in the picture was made using a technique called “layering.” Here are the instructions to create a soap with one color on the outside and one on the inside:
1. Gather your ingredients: You will need a soap base (clear or white), soap colorants (liquid or powder), fragrance or essential oils, a soap mold, and any additional additives like exfoliants or dried herbs (optional).
2. Melt the soap base: Cut the soap base into small chunks and transfer them to a microwave-safe container or a double boiler. Heat it in short bursts, stirring in between until completely melted.
3. Add fragrance or essential oils: Once the soap base is melted, add in your desired fragrance or essential oils. Stir well to combine.
4. Divide and color the soap: Now, divide the melted soap base into two separate containers. You can use more or less soap for each layer, depending on how thick you want them to be. Add a soap colorant of your choice to each container and mix thoroughly until the desired color is achieved.
5. Pour the first layer: Start with the first color you want on the inside of the soap. Slowly pour the melted soap into the soap mold, filling it up to around 1/3 of the mold’s depth. Tap the mold gently on a hard surface to remove any air bubbles.
6. Allow the layer to set: Let the soap layer cool and harden for about 15-30 minutes. You can refrigerate it for faster results.
7. Pour the second layer: Once the first layer is set, carefully pour the melted soap of the second color on top of it. Fill up the remaining space in the mold, leaving a little room for the top layer. Again, tap the mold gently to remove any air bubbles.
8. Let the soap cure: Allow the soap to completely cool and harden for 4-6 hours or overnight.
9. Unmold and cut: Once the soap is fully set, gently remove it from the mold. Cut the soap into desired shapes or sizes using a sharp knife or soap cutter.
10. Cure and store: Place the cut soap bars on a drying rack or a well-ventilated area to cure for 4-6 weeks. This process allows excess moisture to evaporate, resulting in harder and longer-lasting soap bars. Finally, store your beautiful handmade soap in an airtight container until ready to use or give as gifts.
Remember to follow basic safety precautions while working with soap-making ingredients and tools. Happy soap making!