How to Create a Driftwood Candleholder
Three simple driftwood candle holders You can make yourself.
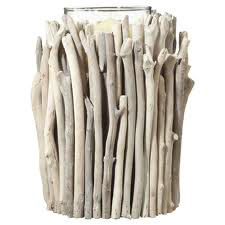
Driftwood Candle holder Style #1
You will need:
- enough cleaned driftwood pieces to fit around a large glass candle container
- multi-purpose epoxy glue
- glass contained candle
- raffia or twine (optional)
- masking tape
Directions:
For this style driftwood candle holder, you will want to have enough clean driftwood pieces to go around your glass container candle – 10-20 pieces to choose from depending on the size of your glass container. It’s best to use 1″ thick linear pieces rather than awkward shaped driftwood pieces.
Determine how tall you want the height to be. Some prefer the height to be just to the top of the glass while I’ve seen others extend it 2-3 inches taller than your glass container. Either way looks great.
- Saw off the ends of each piece so they will line up evenly at the bottom around the your glass container while still giving you the height you want.
- Now one by one, line up a piece with the bottom of the glass container and begin gluing. Continue until you have completed the circumference.
You may wish to wrap masking tape around the pieces to hold them in place while the glue dries. Wait until the glue dries according to the package before using.
Dress up your container with raffia or twine.
A great decorating tip is to create three of these candle holders of various heights for use in displaying.
Driftwood Candle Holder Style #2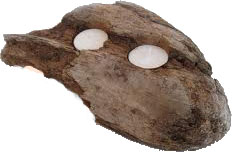
You will need:
- Driftwood
- candles in glass votive holders or tea lights in tin holders
- drill
- 1 1/2″ spade bit (the size of your spade bit will be determined by the size of your votive or tin holder)
Directions:
Suppose you have a wonderfully unique piece that is too big to use for the first style candle holder but you really want a driftwood candle holder. If you have a piece that will sit solidly on a flat surface without being “tippy”, then this is a good option for making your unique driftwood candle holder.
- Lay your driftwood piece on a flat surface and determine where you might want to put one or more candles. Space them out so they won’t cause a fire hazard when lit.
- Once you have identified where you want the candles, mark the center.
- Now secure your driftwood and drill your holes using the spade drill bit to match the size of your votive or tin candle holders. Drill no more than 1/2″ for tin tea lights. You can drill deeper for votive holders. You want to make sure that the hole is not so deep that a lit candle will catch the surrounding edges of the driftwood on fire.
I’ve seen this style used with elaborate pieces and many candles, as well as with one hole and one simple candle – and they are all beautiful.
Driftwood Candle Holder Style #3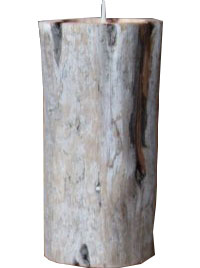
You will need:
- thick cut of driftwood (4″ or more circumference)
- drill
- 1 1/2″ spade bit (the size of your spade bit will be determined by the size of your votive or tea light holder)
- glass votive holder or tea light tins
Directions:
- Cut both ends of your driftwood so both the top and bottom are flat.
- Using the spade drill bit, drill a hole in the center of the top deep enough to fit your tin or votive holder.
- Insert your votive or tin.
This style looks best when the votive or tin sits almost level with the driftwood surface.
A great tip is to make three of this style in various heights for a great display.
There you have it – a driftwood candle holder style for everyone!
For pictures on how to create these driftwood candle holders as well as additional information on DIY driftwood projects, visit http://diydriftwood.com/how-to-create-a-driftwood-candleholder/
Photos. diydriftwood.com
