How to Make Stock for Soup
I have made many stocks over the years, and gradually I’ve found a method that helps me have a good stock result from my efforts. In the beginning, they were more like slightly flavored water, but now they can stand up next to the store bought stuff, without the fat and sodium.
There are several steps to this process, and skipping even one can mean a mediocre finish to your efforts. That will make it harder for you to use it as a base for an herbal remedy.
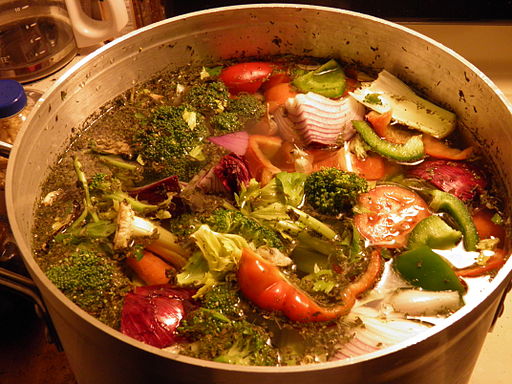
1) Selection:
First, choose the type of stock you want. If you want chicken stock, you want something with plenty of bone and at least some meat. Leave the skin on, as well. You can save/freeze the breast bones after you’ve deboned it for another purpose or use leftovers from a whole roast. I prefer the latter.
For beef stock, my preference is ox tails. I also like marrow bones and shanks with meat attached. The importance is actually in the marrow, which all of these have. It adds flavor and texture to the broth.
2) Roasting:
If you’ve already roasted the chicken, you can skip this step as it’s already been accomplished. However, if it hasn’t been roasted, do so. I like an oven at about 400 degrees. I leave them in for about an hour, or until one of the smoke detectors goes off (family joke). This provides color and opens things up so that they will give off more flavor.
3) Roast Veggies:
Half way through the roasting process, I throw in the veggies. An onion cut in half, a carrot or two broken apart and the same amount of celery. If you have celery with leaves, make sure they go in as well. If you plan on adding parsley, wait until you have the bones out of the oven.
4) Pressure Cooker vs. Stock Pot:
I used to use a standard stock pot for this purpose, but I got a new “toy” for Christmas and have used it since. It’s a pressure cooker. What used to take me twelve hours can now be done in one. I absolutely love it. For stock instructions, read your particular cooker’s manual as the instructions may differ.
If you’re using a stock pot, be prepared for a long wait. You will also need to add water for the first half of the cooking process so that there’s something left when it has been cooked down. As mentioned above, this process takes about twelve hours.
5) Cooling to Skim:
One main reason for making stock at home is that you can control the amount of fat and salt is in the final product. If you chill the stock once you’ve strained the other parts away, the fat will rise to the top and congeal. That makes getting rid of it a cinch.
6) Storing:
If you plan to use it in the next few days, it can stay in the fridge. In that case, wait until you want to use it before removing the fat. It can also be stored in the freezer. I recommend labeling and dating it when you put it in so you remember which one was put in last.
Once you have a stock, you can use it for many things. I use beef stock and sage to help deal with IBS and when a woman wants to wean her child. Chicken is great with garlic for colds and so on. It also matches well with marjoram and can be a pre-camp-out way of deterring but bites.
The Author:
Mary Bodel has been a master herbalist since 2004 although my training began long before I reached that level. I believe that health encompasses more than taking care of our bodies. It involves everything from what we eat to what we read. It involves our spirit as well as our body.


