Tips to Make Yogurt at Home
You can walk into any supermarket and be confronted by all manner of yogurts – flavored, frozen, low-fat, sweetened, unsweetened, and many others. However many of us would like to make yogurt at home, for reasons of economy or health.
Though it can take time, a little bit of know how and some practice, there are several benefits of making yogurt at home: firstly, it can cost a lot less to make your own yogurt at home rather that eat store bought brands. Many people like the taste of homemade yogurt more.
One of the main reasons to make your own yogurt at home is to benefit from the natural live bacteria that may be absent from prepackaged varieties. Yogurts with active cultures have beneficial health impact due to the probiotics that they contain.
There is also the fact that you can avoid certain additives and artificial flavoring that may be added to store bought varieties. And when you make yogurt at home, there is that much less waste being produced in terms of the plastic containers and packaging that is typically used for branded varieties.
Here are some tips to help you get started on making your own yogurt at home:
1. You can use any type of milk – whole milk, reduced fat milk or skim milk. However remember that the richer the type of milk you use, the better the consistency of your yogurt is likely to turn out.
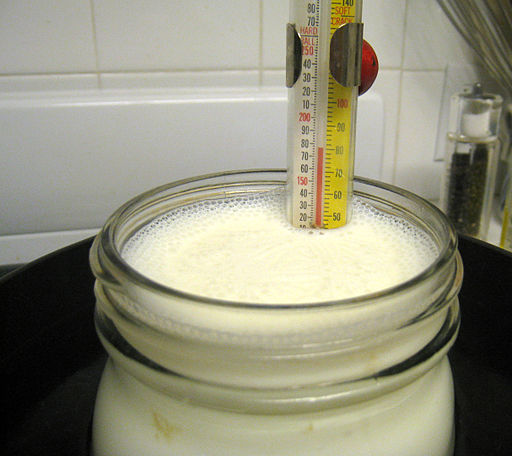
2. If you’re using the skim milk or no fat milk varieties, it may be a good idea to boil the milk – to reduce the volume to get a thicker consistency. If you do boil the milk, make sure that you don’t scald it. So, you should either use a double boiler type of pot, or a thick bottom pan over low heat. Also remember to stir the milk occasionally – this will prevent scalding and also prevent the milk from boiling over.
3. Remember you should let the milk cool after boiling before actually making the yogurt. If your milk is hot, make sure that it gets down to room temperature by putting the pot in a cold water basin.
4. To begin with or when you’re making yogurt for the first time, it may be a good idea to get a small amount of yogurt with live culture.
5. You could also use freeze dried yogurt cultures that are available in the market.
6. Then add the yogurt with live culture (you’ll need just a teaspoon or two) or yogurt culture and stir this in with a clean spoon. If possible use a sterile spoon to avoid any contamination.
7. Yogurt sets best at a warm room temperature. Once you’ve ‘set’ your yogurt, place it in the warmest part of your kitchen (use a heating pad if needed). It should take about 7 hours for bacteria to transform the milk into yogurt.
8. Once you’ve made your own yogurt, you can use the leftover to make yet more yogurt. So remember to put aside a few teaspoons of your yogurt to make a future batch.
The Author:
Yoforia India


Best Ever (and quickest )Yoghurt Tart
Make one biscuit crumb crust (your favourite) or a packet of plain tea biscuits crushed and mixed with two thirds cup butter or margarine.
Press into an oblong pyrex/glass dish – set aside.
Now mix well together: 1 can sweetened condensed milk, 1 x 500 ml double cream mint chocolate yogurt (or any double cream flavour yoghurt.)
Ordinary yoghurt does not work it must be a double cream yoghurt. (TIP: I have used ordinary chocolate mint yoghurt but then you must ass one small carton of thick cream into the yoghurt, otherwise it won’t set.)
Pour over your biscuit crumb crust and microwave on full power for 4 – 5 minutes. ( TIP: Keep a close watch, the minute it looks as if the filling starts boiling up it is ready – microwaves differ so this is the best way to judge when it is ready)
Chill for at least one and half hour in the fridge, you can grate some chocolate over the top- or use chocolate curls – if you so wish, for added interest, or otherwise reserve a little bit of the biscuit crumbs to sprinkle on top.
TIP: (You can make your own sweetened condensed milk, just type condensed milk recipe in your browser and hundreds will come up and I think it would work out a bit cheaper too. (you will need about one and a half cup.)
It is a real life saver if you’re in a hurry, prepare the tart first in 10 minutes flat, put in fridge and continue cooking the rest of the meal while the tart/pudding is setting in the fridge.
Enjoy!