Handmade Garden Stepping Stones
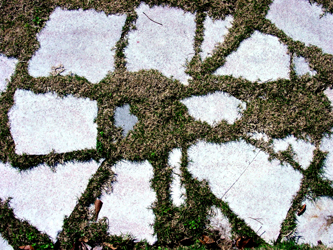
Stepping stones are a functional way to dress-up your lawn or garden and can be made into fun craft activity for the family to make for your home or as a gift idea.
The basic steps for construction will be the same for all of these craft ideas. The shape of your mold can vary and of course, the final decoration will alter this craft, allowing you to create several other projects.
Basic Stepping Stone Supplies:
* Large Plastic Bucket or Wheel Barrow
* 1 40 Pound bag of pre-mixed concrete
* Water
* Shovel
* Hand Trowel
* Plastic Wrap
* Mold
* Plastic Gloves
* Petroleum Jelly
Using the measuring guide on the package, only mix up the amount of cement you will need for your project. This kind of cement mixes easily with water and you can add more water or mix as needed for the desired consistency. You want a thick base but not one that is to dry.
You have several options of material to use for your mold. Disposable aluminum pie tins are available in a deep dish size that works well but avoid the kind of pie tin that has slanted sides. The cement will be to thin on the edges and could break off over time.
Another inexpensive mold option is to purchase the plastic circles that garden centers sell to put under potted plants for drainage. They come in several different sizes. Both of these products make wonderful round stepping stones and can be thrown away after use.
When you cement mix is ready, carefully scoop the mix into the mold. Using a cement hand trowel, tap the cement mixture to break up any air pockets and insure a solid base. Next, use the trowel to smooth the surface. Any excess liquid will automatically come to the surface of the mold during this process.
Handprint Stepping Stones
Cover the children’s hands in petroleum jelly to protect them from the harmful lye’s that can irritate their skin. Roll up their sleeves and carefully press their hands into the cement. Hand Imprints are a fun way to measure your child’s growth and will be a sentimental garden favorite.
Kids could also make a picture on the stone using food coloring to stain the cement. It will also stain your hands so wearing plastic gloves and an apron is a good idea. Don’t forget to sign and date it!
Time Capsule Stones
Gather a collection of memorabilia that reminds you of the important events of the past year. Look for miniature toys or decorative key chains that symbolize larger events you are trying to portray. Examples you could use: A baby rattle to stand for the new baby you had that year or a fishing fly or lure (hook side down!) to remember the summer fishing trip – get the idea? Using a stick or plastic knife, carve the year in the middle of the stone. Arrange your objects around the date and leave the mold to set up.
Time Dial
The basic stepping stone can also make a fun time-dial. Purchase Roman numeral clock numbers at a craft and hobby store. The dial need to be rather long and weather proof. I suggest using a brass plant hanging arm or metal shelf bracket for best results. Check out a book from your local library to learn how to tell time with your new dial.
The Author:
Copyright 2001 Rachel Webb


