Organize your Crafting Workspace
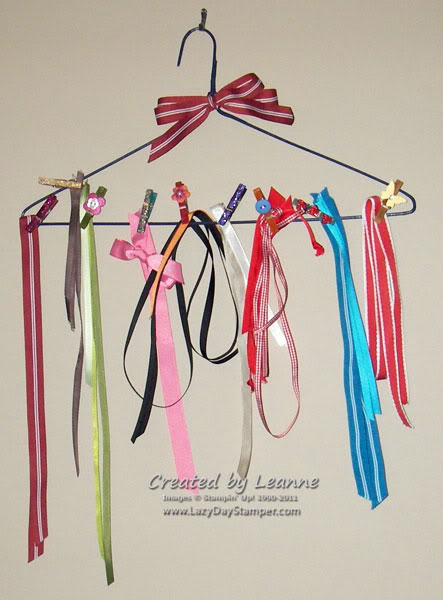
If your craft scrapbook workspace is messy because there’s lots of ribbon pieces lying around, here’s your solution to corral the mess AND spark your creativity. This little organizer will allow you to hang all your remnants where they’re easy to see… and you’ll be more likely to use them for your next scrapbook page or greeting card. Let’s get started!
Today’s Feature Project: Ribbon Remnant Organizer
Supplies Needed: Plastic-coated wire hanger, Acrylic Craft Paint, Foam Paint Brush, Mini Wooden Clothespins, Embellishments, Fast-acting Adhesive (or Hot Glue Gun) and Ribbon Remnants
Getting Started:
- If you don’t have them already, purchase a small bottle or two of acrylic craft paint, small foam paint brush, and a package of mini wooden clothespins.
- Pull a sturdy plastic-coated wire hanger from your closet (plastic tubular hangers are too thick!). If available, pick a color that matches the color scheme of your workspace… or be brave and pick a new color!
- Search drawers, boxes and bins for all your Ribbon Remnants (like Stampin’ Up! ½” Striped Grosgrain Ribbon or 5/8″ Satin Ribbon). All your essentials are at hand… let’s get going!
Decorate Your Clothespins:
- Use your foam paint brush and acrylic craft paint to paint your wooden clothespins.
- Paint the front, back and sides. Be careful not to get paint in the spring as it will ‘freeze’ the clasp and your pin won’t work! The paint will dry quickly so this step shouldn’t take too long.
- If you prefer, you can paint pins in different colors, you can paint several colors on each pin – the choice is yours!
Now let’s add some personality!
- Pick your favorite ribbon and tie it on the hanger at the point where the ‘hook’ meets the body of the hanger. Make several loops for the bow to give it more fullness… and make it more of a feature on the hanger.
- Take several of your clothespins and add embellishments to them, securing them with fast-acting glue or even by using a hot-glue gun. I suggest crocheted flowers (like Stampin’ Up! Fleurettes), buttons (like Stampin’ Up! Designer Buttons) and some bling (like Stampin’ Up! Basic Rhinestones or Basic Pearls).
- You can even add luster with paint or glitter (like Stampin’ Up! Champagne Mist Shimmer Paint or Stampin’ Emboss Powder). The possibilities are endless!
Wow… you’re done with the construction… now it’s time to put it together!
- Use your decorated pins to hang your ribbons on the hanger in the manner that best suits your needs… by color, by size, by type/ texture.
- Then find a prominent place in your Crafting Workspace and hang up your new Ribbon Remnant Organizer.
Congratulations! You’re done! Your Ribbon Remnant Organizer will keep your ribbon bits and pieces organized and easy to find, and will add a welcome splash of color to your room. You’ll be surprised how often you’ll be adding ribbon to your craft projects now that they’re easy to see and use!
Copyright 2011 Leanne Gorsuch
The Author:
Leanne Gorsuch, a Professional Paper Craft Instructor and Creative Coach.
Source: Ab

