Growing Organic Asparagus
The native areas for growing asparagus are in Spain, Great Britain, Ireland, and Germany. If you’re concerned about your health, growing asparagus is a great low-calorie source of folate and potassium. Peru loves growing asparagus; it lead the world in asparagus exports. The United States also loves eating asparagus; it was the leading importer as of 2004.
When to Plant
You can grow asparagus from “crowns” or seeds. Most gardeners start with crowns as seed take an additional year to harvest. Growing asparagus from crowns takes 2 to 3 years before you’ll be able to harvest; about 3 to 4 years from seed (which is why most gardeners choose crowns). You can plant asparagus crowns a 4 to 6 weeks before your last frost. Asparagus is a hardy plant and will survive most winters. It’s a good practice, though, to mulch your asparagus in the fall with straw for a little extra insurance. In the Southern climates, you can plant asparagus in the late fall and starting around mid to late January. While it’s not necessary, you can start seeds or crowns indoors (see “Starting Asparagus Indoors” below) 12 weeks before the last frost.
Where to Plant
Asparagus loves sunlight, but can survive some shade. It should have at least 8 hours a day of sunlight. Asparagus also likes cool weather the best. It will tend to bolt (go to seed) if it gets too warm too quickly in the spring. The ideal growing temperature for growing asparagus is 60° to 65°F. As asparagus doesn’t mind competing with weeds and grasses (which also help keep the soil cool), planting it along a fence line or on an edge of your garden works well. Asparagus is not a swamp grass, so it likes well-drained soil when possible. In our area our soil is a little heavier, but has a lot of small rocks, so the soil drains well and is ideal for growing asparagus. Planting asparagus around the edge of a garden or lining a fence is the perfect place for them in order to receive a good amount of sunlight without disturbing any other landscaping possibilities in your garden.
Preparing The Soil
Ideal pH levels for soil that asparagus is growing it is 6.5 to 7.5. Asparagus will not grow in soils with a pH of less than 6.0. Asparagus loves nitrogen. Some good sources of organic nitrogen is composted manure, especially chicken manure (organic if available) and bone meal (add 10 to 20 lbs. per 100 square feet). Because asparagus needs to develop a strong root system, it needs significant amounts of phosphorus. Good sources for organic phosphorus are bone meal or rock phosphates. Asparagus also likes a good supply of potassium. Compost (with banana peels if you have them), wood ash (particularly hardwood), and granite dust are good organic sources of potassium. If you’re starting in a fresh garden area, it should be noted that a planting of asparagus can last up to 20 years, so you’ll want to apply generous amounts of the above soil supplements prior to planting asparagus. If you are able, plant in an area free of Johnson’s grass (quack grass) as weed control becomes difficult once your asparagus is planted; and it may be in the same spot as long as 20 years.
Choosing The Right Seed Varieties for Your Area
As Asparagus rust can be a problem in some areas, check with your county extension to see if you need to plant rust-resistant varieties like Viking KB3, Jersey Giant, and Martha Washington. Asparagus Crown Rot is another problem that you should check with your county extension on. The Jersey Giant, Viking KB3, Jersey Knight, and other “Jersey” family asparagus are all resistant to the rot.
Seeds and Germination
Asparagus seeds are good for up to three years after you’ve initially purchased them. To get your asparagus seeds to germinate more quickly for planting indoors, pre-soak them in water or a compost tea (compost mixed with water). [The USDA recommends a water temperature of 85° to 90°F for 4 to 5 days].
Once you’ve soaked your seeds, plant them immediately in flats or individual pots. The best soil temperature for germination is about 70° to 77°F. They should come up in about 10 to 12 days at this temperature. Asparagus seeds will germinate in 53 days at 50°F, 24 days at 59°F, and 15 days at 68°F. Germination times begin to increase above 77°F. If you’re planting seeds in your garden, the best temperature range for your soil is around 60° to 65°F.
Getting Started Indoors
Although asparagus is a cool-weather plant and it’s really not necessary to plant it indoors, we like to offer you the option to do so with these simple instructions. I covered a bit of how to start indoors in the section immediately above this on germinating your seeds. This will give you additional information. You can soak your seeds per the USDA recommendation (if you trust your government to know best) for 4 or 5 days. Others recommend planting the seeds in potting soil after soaking just a couple hours. Either should work.
Don’t use garden soil for potting soil to start your plants as it may have weed seed and/or bacteria that may become harmful to your plants at the warmer inside temperatures. Make sure your potting soil has a pH balance of 6.5 to 7.5. If you need to bring it up quickly, add lime to the soil. Add sulphur if you need to lower it. While you can plant asparagus seeds in flats, small peat pots are preferable as you can plant the whole pot directly in the soil. This leaves the roots undisturbed and your plant will have less shock when transplanted.
Container Gardening Asparagus
We’ve had questions about growing asparagus in containers. If you live in an area where you can’t garden, this is an option to consider. If you’re going to grow asparagus in a container, you need to make sure you’ve got lots of room for asparagus’ roots. A 5-gallon bucket is about as small as you’d want to go…maybe too small of diameter. The recommended area for the roots of one containerized asparagus plant is 20″ x 20″ – I can’t verify this to be true as we’ve not planted asparagus in containers and are relying on outside information on this topic.
If you do use a plastic container or bucket, drill several 1/2″ holes in the bottom and a couple on the sides (opposite of each other), so the water will drain well. On the bottom of the container, put a couple inches of small stones, then add your potting soil on top of that. The next section will tell you how to plant your seeds in pots or in your garden.
Planting Seeds
Plant your asparagus seeds about 1/2″ deep in a peat pot, container, or in your garden. If you want one plant, plant two seeds. Usually you’ll have at least one seed germinate. If both germinate, cut the other off at soil level to reduce your plants to one. Pre-sprouting seeds is a useful option as well…place your seeds between damp paper towels and put them in a Zip Lock-type bag and place in an area that remains at about 70°F. The seeds will germinate at about 10 to 14 days.
After the seeds have germinated, move to a cool, light area like a windowsill, but out of direct sunlight. If two plants come up, remove one carefully or cut it off at the dirt level.
Transplanting Seedlings to Your Garden
To acclimate your asparagus plants to the outdoors, once the threat of frost is past, take your plants out-of-doors for a couple weeks during the daytime. This is called “hardening off” your plants and helps prepare them for transplanting. Once the threat of frosts are over they will need to be gradually accustomed to conditions outside – this known as ‘hardening off’ and can take between 2-3 weeks.
Initially you’ll want to put them in the shade most of the day, but gradually increase the amount of sunlight they’re getting. Keep the soil moist but not wet. You may note that as you move them in and out, leaves may yellow and drop. This is normal as your plants are getting ready to put on new leaves that are more suited to the outdoors.
After a couple of weeks, transplant your seedlings to the garden. If you’ve used peat pots (recommended), cut the bottoms off, dig a small hole, and put the entire pot in the hole.If you’ve used a flat, remove the plant with the soil intact as carefully as possible so as not to disturb the roots and place carefully in the small hole you’ve created; backfill and press the dirt firmly around the plant.
Planting Asparagus Crowns in Your Garden
If you’ve chosen to plant asparagus crowns, purchase one-year old crowns as they’re less prone to breakage than older crowns. A good-quality one year old crown should have 8 to 10 roots and a healthy bud cluster will give you good potential to harvest some asparagus the following year. Plant the crowns in the early spring 4 to 6 weeks before the last frost. To plant your asparagus crown, soak the roots in warm water for a couple of hours.
Lightly trim the roots (they can be quite tangled). Dig either a trench or a series of 12″ deep holes – the plants should end up about 18″ apart. Mix compost, bone meal, manure, and other soil supplements into the dirt that will be put back into around the roots, and/or in the bottom of the hole. Remove any dead or rotted roots from the crown; place the crown bud side up in the hole and spread the roots out. Mounding the dirt up in the trench will help when spreading out the roots. Pack dirt around the roots, then cover the crown with 2 to 3 inches of soil. If there is still some room in the trench, add dirt over the asparagus gradually through the summer as the crowns will tend to rise.
Direct Planting (planting seeds directly into garden bed)
If you want to plant your asparagus seeds directly in the garden, add your supplements to the soil and till or spade them in. Soak your seeds for 48 hours between wet paper towels in a Zip Lock-type bag. If you can, keep the temperature at about 85°F during the 48 hours. Plant your seeds 4 to 6 weeks before the last frost. The seeds will germinate, albeit slowly at this time of spring.
Plant your seeds about 3 inches apart: plant 3 tight rows about 15 to 18″ apart, then plant your next triple row about 4 to 5 feet away if you are going to grow a lot of asparagus. When you put soil over your seeds, make sure it is moist and packed in around the seeds well and that the soil doesn’t dry out. If you want to harvest asparagus at variable times, you can plant the crowns at different depths; (3 inches, 4 to 6 inches, 6 to 8 inches, 8 to 10 inches). Mulching half of your asparagus can also accomplish this; the exposed soil will warm up more quickly and the asparagus will come up faster.
Growing Your Asparagus
Once your seedlings have emerged, thin your plants to 12″ to 14″ apart. Adding mulch over your asparagus will help control the weeds and keep the soil moist as well as adding nutrients to the soil. It is a best practice not to harvest any asparagus for the first couple of years; this allows the roots to become well-established. Asparagus will grow “ferns” during these first couple of years. These ferns are receptors for photosynthesis and are what will help give you asparagus spears next year.
Asparagus is considered to be drought-resistant because of its deep roots. However, good moisture levels in the soil will reward you with a better crop. Throughout the year, continue adding composted vegetable and manure waste to your asparagus for better results next year. In the fall, after the frost, cut or mow the tops of your asparagus to 2 inch stubs when the foliage has turned yellow and the before the red berries fall off the plants.
When you’re growing asparagus, when the ferns are growing in the summer, spray them with a liquid organic leaf spray fertilizer. We highly recommend these sprays as they naturally stimulate your garden plants to produce more plant sugar in the photosynthesis process. That in turn creates a more robust plant, more produce from your garden, and better and sweeter flavor from your crops. And they have a really good warranty!
Weeding and Mulching
We’ve discussed using mulch for delaying harvest, retaining soil moisture, and weed control. How much and what types can be used? We prefer barley straw as we have a ready and inexpensive supply in our area. You can also use grass clippings or chopped up leaves. Hay isn’t a good option as it’s full of weed seed. I recommend 3 to 4 inches of straw mulch, and 2 to 3 inches of grass clippings applied 2 or 3 times during the growing season. This will vary by the length of your growing season.
If you want to speed up harvest on half of your asparagus, as mentioned above, remove the mulch in order to warm up the soil. Don’t till around your asparagus to control weeds. If you use a hoe, stay back from the plants at least 6 inches and hoe just the surface. Hand-pull any weeds that are closer to the plants. Asparagus is salt-tolerant, however, the practice using salt to control weeds is not recommended.
Watering
Asparagus does best with drip irrigation, but if this isn’t an option, water heavily in the morning when your soil appears dry; the plants have time to dry out completely by afternoon. Watering in the morning will help your asparagus not to develop fungus-related diseases. You should water 1 to 2 inches at least once a week during the summer heat; mulching, as mentioned before, also helps keep the soil cool and retains moisture. Don’t overwater or underwater asparagus.
Stop watering asparagus in October and November to make the plants turn yellow and go dormant. By the time asparagus is 4 years old, it has developed a root system that can go as deep as 48″. You can irrigate every 2 or 3 weeks, but water heavily enough to get down to those roots.
Companion Planting and Rotation Considerations
Plants that play well with asparagus:
Marigolds, parsley and basil help control asparagus beetles (more on that in the “Pests” section below). Parsley is also said to invigorate asparagus. Dill aids in controlling spider mites and aphids. Coriander is also helpful in repelling aphids, spider mites, and potato beetles. Comfrey helps to build calcium, phosphorus, and potassium in the soil. It also helps control slugs, and is said to be a good compost activator. Tomatoes are probably one of the best companions for asparagus. The tomato plant repels the asparagus beetle, and asparagus repels harmful root nematodes that affect tomatoes.
Plants That Don’t Play Well with Asparagus:
Onions, garlic, and potatoes attract the wrong sorts of insects and predators to hang out in your asparagus patch. You don’t really need to worry about rotating your asparagus crop except every 20 years or so. Pay close attention to the ground before you plant it though.
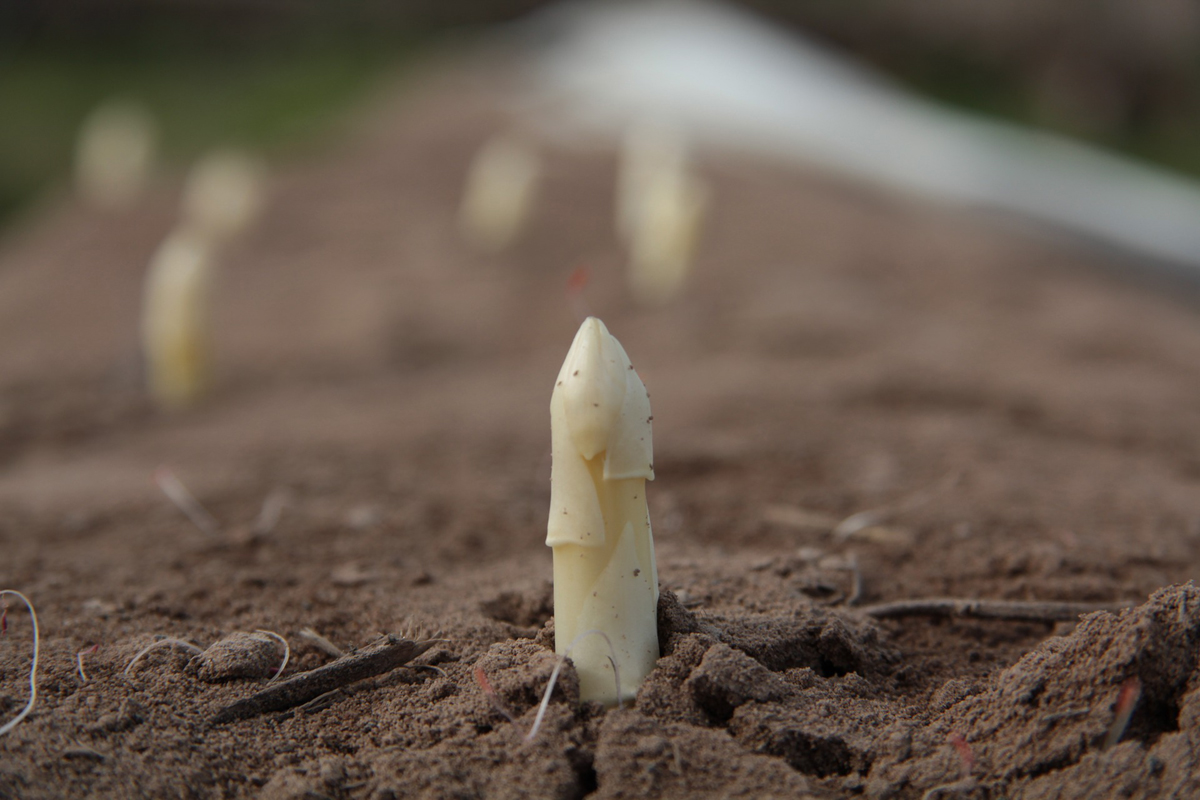
When to Harvest
When asparagus stalks reach anywhere from 6 to 9 inches, cut them at or slightly below the soil level; definitely harvest them before they flower. You can also snap the spears off to harvest them; bend them with a quick motion by grasping near the base of the spear. Don’t harvest anything the first year, lightly the second year, then go for it on the third year. Add a year to the previous if you’re planting from seed. Asparagus harvest lasts about 8 weeks; harvest daily. If you don’t, the spears will become tough and inedible.
Pick your asparagus patch clean so those nasty little asparagus beetles don’t have any place to lay their nasty little eggs. At the end of harvesting, large ferns will develop from any remaining spears…these will strengthen the plants for next years harvest.
Storage
It’s best to cool your asparagus as rapidly as possible once you’ve harvest it (harvesting in the morning is also desirable if possible). An ice-water bath is an effective way to cool asparagus rapidly. Fill your sink with water and ice; when you’ve picked your asparagus, place it in the ice-cold water to rapidly cool it. After cooling your asparagus, refrigerate it; it will keep for 2 to 3 weeks at 35° to 40°F. It goes bad quickly over 40°F. Asparagus can be blanched and frozen, canned, and pickled. Jenny pickles asparagus and it’s a family favorite during the holiday season.
Preventative and Natural Solutions to Common Pests and Problems
Pests: the worst insects when you’re growing asparagus are the asparagus beetle, the spotted asparagus beetle, and the asparagus aphid. Asparagus beetles are common wherever asparagus is grown; adults and larvae both feed on the spears in the spring and damage the crop, then defoliate the ferns in the summer which affects the crop the following year.
Defoliation by asparagus beetles can also make asparagus susceptible to fungal diseases like fusarium. They show up about the time the asparagus does in the spring and cause asparagus to turn brown, scar, or bend over. Asparagus beetles are about a quarter of an inch long, oval, with antennae. They’re kind of bluish-black and has 6 beige-colored spots on its back.
Adult spotted asparagus beetles are more common in the Eastern U.S., but are pretty much the same as far as what they do to your asparagus, but the larvae doesn’t do much damage to the spears as it feeds on the berries later in the year. They’re about the same size as the asparagus beetle, but they’re reddish-orange with a dozen black spots on their backs. They look a bit like ladybugs, but ladybugs have variable quantities of spots.
So, how do you control these little pests? If you’re able to, you can let your hens forage on the beetles. Organic pyrethrins are also effective against the asparagus beetles. If you have a small patch, you can patrol your patch daily and pick the little buggers and their eggs by hand and drop them in a pail of soapy water. You could also introduce natural predators such as the chalcid wasp or ladybug larvae. The asparagus aphid comes from Europe; it first showed up in the U.S. in 1969, and is pretty much all over North America now. The asparagus aphic causes “witches broom;” a stunted, bushy growth. However, they’re not difficult to control with pyrethrins or insecticidal soap sprays.
Environmental Factors
The most common diseases found in asparagus are purple spot, asparagus rust, and asparagus crown rot. Asparagus rust causes rusty orange to yellowish spots on asparagus stems after the harvest. Asparagus rust is caused by disease with a long Latin name. The upshot is that at first there’s some light green lesions early in the season. These are followed by tan-colored blisters, and finally black blisters that protrude later in the season, usually after harvest.
Severe rust infections can kill or stunt asparagus shoots, reducing the asparagus’ plants ability to gather strength for the next season’s crop. If you rub your hand across the asparagus stalk, and it turns orange, your plants have rust. The best way to control rust is to plant varieties that are resistant before you have problems: Viking KB3, Martha Washington, and Jersey Giant are a few varieties that are rust-resistant. Asparagus crown rot is caused by a fungus with another long Latin name, but the short version is Fusarium and it causes blight in the asparagus crown.
You’ll suspect your plants are infected with Fusarium if your asparagus wilts in the summer heat, turns yellow before fall, or just dies. If the crowns turn brown, and on further investigation you find the roots are also decaying, your plants have been infected. The best way to control this disease is to choose varieties that are resistant to it; a couple of names are Jersey Giant and Viking KB3. Lastly, purple spot disease on asparagus plants is caused by yet another long Latin name. It seems to me if they’d stop using these long Latin names we wouldn’t be having these problems with these diseases (that’s a joke…hahaha).
Purple spot disease shows up as, you guessed it – purple spots! Usually on harvested spears. It lives through the winter, but appears as black spots on the dead ferns. Purple spot disease tends to multiply during wet years. To get rid of purple spot disease; remove, burn, bury, or destroy crop debris in the fall.
The Author:
Barry Brown is a 3rd generation organic gardeners who is passionate about a sustainable and natural lifestyle. His personal standards for organic living far exceeds USDA certification, which he believes is more about money than food quality and purity.