The Art of Root Cellaring
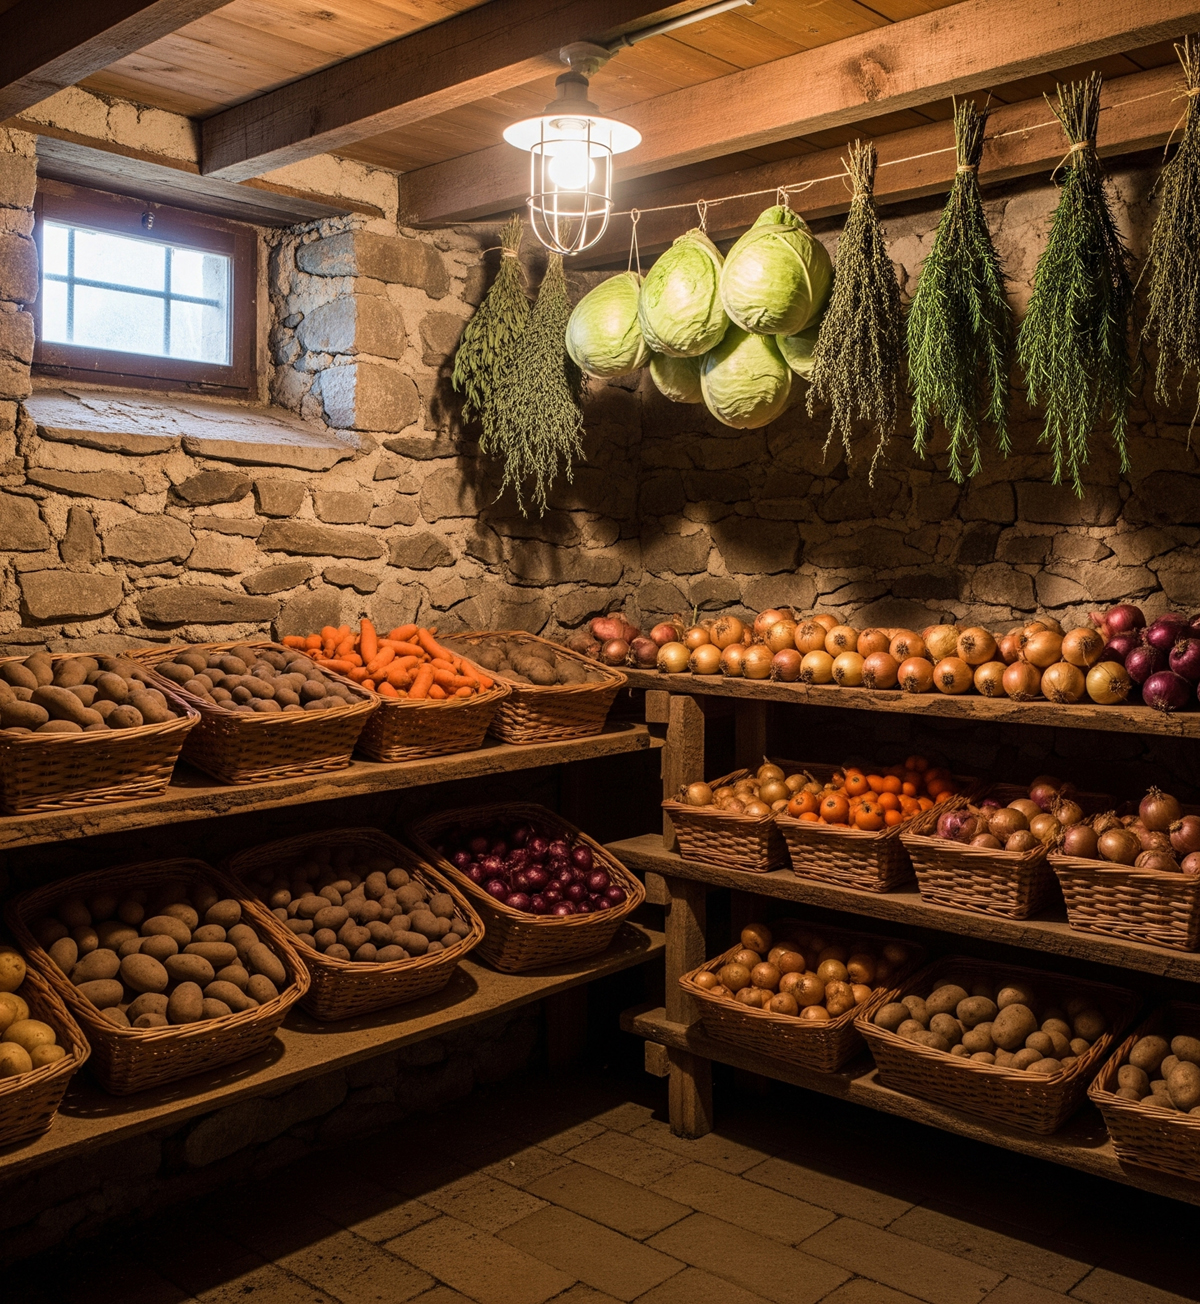
Root cellaring is an age-old method of food storage that lets you preserve your garden’s bounty through the winter. By replicating the cool, dark, and humid conditions found underground, you can keep certain fruits and vegetables fresh for months. This guide will walk you through the essential steps to create your own simple, effective root cellar, detailing what you need, how to build it, and how to maintain it for the best results.
Understanding the Basics of a Root Cellar
A root cellar is simply a storage space designed to mimic the earth’s natural, stable climate. The key elements are:
- Cool Temperature: A steady temperature between 32-40°F (0-4°C) is ideal for slowing down the respiration rate of produce, which prevents spoilage.
- High Humidity: A humidity level of 85-95% keeps produce from drying out and shriveling.
- Darkness: Light can cause some vegetables, like potatoes, to turn green and produce a bitter taste.
- Ventilation: Proper airflow is critical to prevent the buildup of gasses like ethylene, which can accelerate ripening and spoilage.
Step-by-Step Instructions for Building a Root Cellar
Creating a simple root cellar doesn’t require a large, complex structure. You can use an existing space or build a simple one.
1. Choose a Location
The most important decision is where to put your cellar. An ideal spot is naturally cool and stays a stable temperature year-round.
- Basements or Crawl Spaces: If your home has a cool, unheated basement or a crawl space, you can easily section off a corner. Look for a spot with a dirt floor, as it will naturally help maintain humidity. If you have a concrete floor, you can add a layer of damp sand or gravel to help with moisture.
- Underground Structures: If you have the space outdoors, you can dig a small pit or bury a large container like a trash can or barrel. This is an excellent option because the surrounding earth provides excellent natural insulation.
- Garages or Sheds: In cooler climates, an unheated garage or shed can work, but you’ll need to add insulation to protect the space from extreme temperature swings.
2. Prepare the Space
Once you’ve chosen a location, you need to prepare it for storage.
- Insulate the Walls: If you’re using a basement or garage, consider adding insulation to the walls and ceiling to help stabilize the temperature. You can use rigid foam insulation boards or other insulating materials.
- Add Vents: Proper ventilation is non-negotiable. You’ll need two vents:
- Intake Vent: This should be near the bottom of the cellar to draw in cool, fresh air.
- Exhaust Vent: This should be near the top to let warm, stale air escape.
- You can use simple PVC pipes or other ductwork to create these vents, adding mesh screens on the ends to keep pests out.
- Create Shelving and Bins: Install shelves or create bins to keep different types of produce organized and off the floor. Use slatted shelves or wire racks to allow for maximum air circulation.
3. Control Temperature and Humidity
Maintaining the right conditions is the key to successful root cellaring. You will need a simple thermometer and a hygrometer to monitor the temperature and humidity.
- Maintain Temperature: If your cellar is too warm, open the vents to bring in cool air. If it’s too cold, you may need to add more insulation or temporarily close the vents to trap some warmth.
- Maintain Humidity: If your space is too dry, you can:
- Pour water on a dirt floor.
- Place a large pan or bucket of water in the cellar.
- Lay damp burlap sacks on the floor.
The Best Vegetables for Your Root Cellar
Not all produce is a good candidate for long-term storage. These vegetables are excellent choices for root cellaring.
- Root Vegetables: Carrots, potatoes, beets, parsnips, turnips, and rutabagas are all perfect for root cellaring. They should be stored in boxes or bins filled with damp sand, sawdust, or peat moss to prevent them from drying out.
- Cabbage Family: Cabbage and Brussels sprouts can be stored whole. Simply pull the entire plant from the garden (with the roots still attached) and hang it upside down in the cellar.
- Onions and Garlic: These alliums need a cool, dry, and dark space. They are best stored in braids or mesh bags to allow for excellent air circulation.
- Winter Squash: Varieties like butternut, acorn, and spaghetti squash thrive in root cellars. They should be cured (hardened in the sun for a week or so) before being stored on shelves, not touching each other.
Maintaining Your Root Cellar
Once you have your cellar set up and filled with produce, you need to check on it regularly to prevent spoilage.
- Inspect Regularly: At least once a week, inspect all stored produce. Remove any items that are showing signs of rot, mold, or spoilage immediately.
- Ensure Airflow: Make sure there’s enough space between items to allow for good air circulation. Avoid overcrowding shelves and bins.
- Monitor Conditions: Keep an eye on your thermometer and hygrometer. Adjust your ventilation or add more water as needed to maintain the ideal temperature and humidity levels.
By following these instructions, you can create a simple root cellar that extends the life of your harvest and provides fresh, homegrown food throughout the winter.
The Author:
Pioneerthinking.com: Ingredients for a Simple Life. Insights from a seasoned professional rooted in country living, with 28 years of horticulture expertise and over two decades of practical experience in homesteading, natural beauty, natural health, cooking and creative living.
Photo. Gemini
Do you have a specific type of vegetable in mind that you’d like to store? Tell us in the comment section below. 🙂


