Growing an Avocado Tree From a Seed
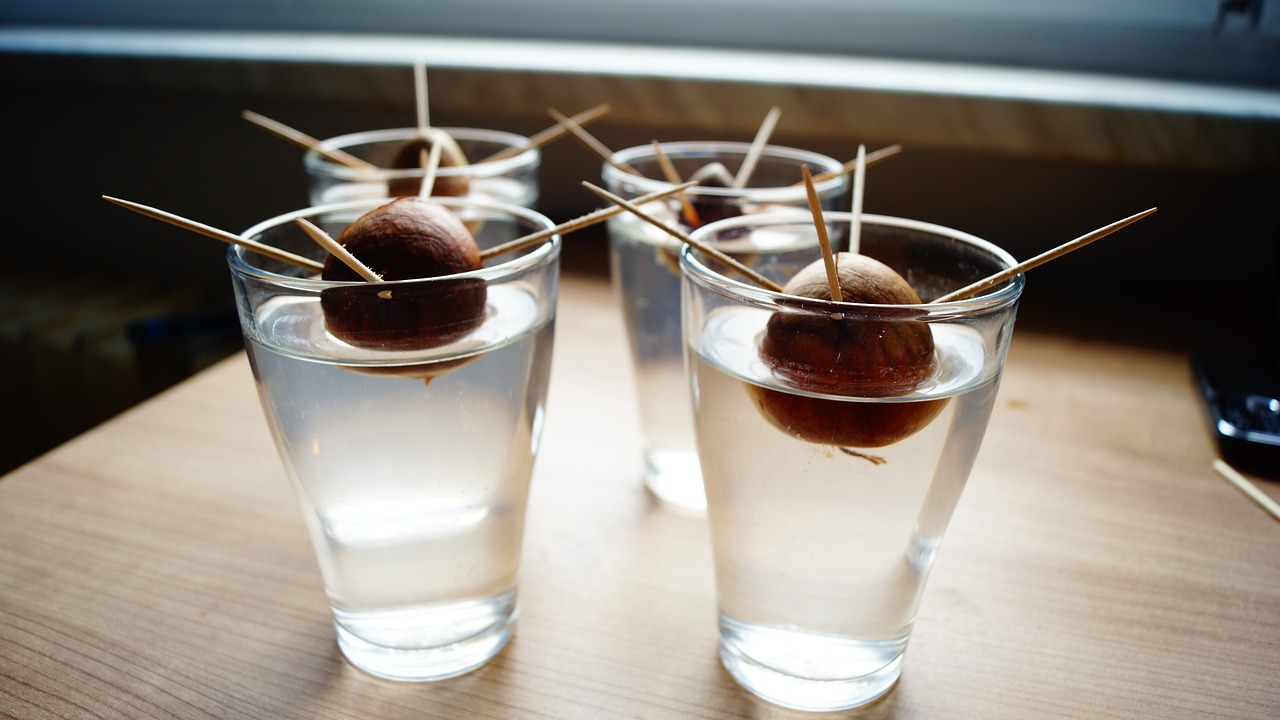
My desire to garbage garden often goes wild and this month has been no exception. I have taken tops from pineapples and re-grown the plant along with green onions and an assortment of other plants which have been headed for the trash pile. This article will tell you how to go about growing avocado seeds into a beautiful plant.
If you are one of those people who can eat avocado on a daily basis from dip to salad additions, you could easily expand your green plant collection with a vast assortment of avocado trees. The more avocados that you and your family eat the more pits you accumulate and the more trees you have an opportunity of producing.
Many people realize that if they plant the pits they can reproduce an avocado tree however the problem is that a lot of people do not know how to do it successfully. Don’t go off with the assumption that you will eventually end up with bushels of avocados, as those trees which start life from the pits rarely produce fruit. However notice I said rarely for who knows you may get lucky and have a great harvest. Generally, if you are determined to grow fruit from your tree you will either need to graft a portion onto the tree from a fruit-bearing tree or possibly wait for as long as seven years to see the fruit materialize. Either way it is a lot of fun to grow these trees especially if you have young children who would enjoy watching the plants grow and develop.
In the paragraphs which follow I will explain to you how you can get that garbage pit seed to transform to a beautiful house plant. All that is needed is an avocado, a few toothpicks, some water and a sunny location.
Avocado trees prefer warm, sunny locations, however it is totally possible to successfully grow one indoors in any sort of climate. Although the actual trees tend to grow to heights of 20 to 40 feet you can maintain reasonable measurements for indoor use simply by pruning or pinching them back. Keep in mind that not ever plant will root so you may have to try several times. The notes I am providing you here will minimize your loses on these pits.
Materials List
- 1 avocado pit
- 4 toothpicks
- 1 small container
To remove the avocado pit take a sharp knife and slice it down the center. Turn the fruit in a circular motion as you are cutting it. Finally twist the fruit in opposite directions to break it in half. The two halves should separate quite easily. The fruit will now be sliced in half and on one half you will see the pit.
Carefully remove the pit and wash it well to dispose of any pulp that may adhere to it. After rinsing the avocado pit under cold water take and dry it off with a towel. Your goal is to remove all traces of the avocado. Keep in mind that for several weeks this pit will be sitting in water and you do not want any strange items starting to grow. You should end up with a beautiful brown looking pit.
When you are ready to root the pit, place the pointed side up. In a week or so the avocado stems and leaves will start to sprout out the top as the plants root begins pushing its way through the bottom. To get to this point you need to stick toothpicks into the pit. Grab your toothpicks and begin push one toothpick into the side of the avocado pit. Get it in sufficiently far that you could pick up the pit by the toothpick. Do this with the other two toothpicks as well. Try to evenly space the three toothpicks around the fruit.
Place the avocado pit over your container so that the toothpicks are resting upon the rim of the container with the pit suspended over the center. You may have to wiggle the toothpicks a bit so that they are slightly tilted up. At this point you will fill the container with water so that the avocado pit is partially submersed.
Make certain that you add water in the container each and every day so that the pit is continually submerged into fresh water. Place the avocado on a sunny window sill and keep a close eye on it. Replace or change the water as necessary.
For the first couple of weeks the avocado pit will likely not do anything. In fact, you may start to wonder if it is actually dead. Don’t get upset as it takes time. Nature has a knack for taking her own sweet time when producing her children – Be patient. In about three to six weeks the top of the pit will begin to split open followed by several weeks of stem growth. You will see a stem shooting up from the pit along with the plants first leaves sprouting on it. On the bottom of the pit you will also notice roots starting to grow. As they grow the roots will start to force their way through the bottom of the pit. Within a few more weeks you should start to see more and more leaves forming. Expect the pit to remain in the water for a period of approximately three months. Don’t be fooled because you see roots developing and shots sprouting up. Wait the complete three months or you might not be successful at growing them.
→ Tips for Ripening and Using Avocados
When the plant grows to a height of 7 to 8 inches you should nip some of the top leaves off. There is no need to cut them off just pinch them from the growing plant. This will encourage further plant growth and assist in the tree branching out. Next take a 10 inch pot ensuring that you have several drainage holes in the bottom and fill it to about one inch from the top. Use a good quality potting soil for this.
In the center of the pot dig a shallow hole that is deep enough to cover half of the pit. Place the bottom of your avocado plant in it root side down. Be careful working with the avocado plant roots as they are very tender. You could easily defeat your efforts at this point if you are careless. After carefully sitting the root system into the hole cover the pit halfway up with loose soil. Press down slightly on the soil to secure the plant in place but do not pack it. The plant should be standing up straight and not bent to one side or the other. Gently pour some water into the pot to assist the soil in settling. Remember you should not pack the soil down hard as you do not want to damage the growing root system.
Set your tree in a sunny location and keep it watered. Since avocado trees like warm, sunny locations if you fail to provide it with enough light it will become all stem and no leaves. This condition is known as leggy. Depending upon your physical location you may be able to place your potted tree outside in a sunny location. Beware if your temperatures start to approach 45 degrees F. If you see those temperatures happenings make sure to bring your plant indoors.
When you water the plant give it just enough to keep the soil moist but not to saturate it. You do not want your avocado tree to be sitting in a puddle of water when it has been potted. If the leaves begin to turn yellow it is a sure sign that you are watering the little guy a bit too much. In that case you must ease back on the watering. Stop watering the plant for a few days to allow the soil to dry out. After the tree has grown about 8 inches start to pinch off the top leaves to encourage it to branch out and become bushy.
The Author:
Copyright @2013 Joseph Parish
http://www.survival-training.info


I was so proud of my sprouting avocodo seed, leaves started to grow! I was about to plant it in soil, but decided to read more about the process before doing so. I unfortunately read from a different blog that I needed to cut 3 inches of the top stem vs pinching a few leaves from the top. Did I just stop further growth of my avocado plant/did I kill it altogether? Thank you!
Don’t worry, you haven’t necessarily killed your avocado plant! While pinching a few leaves from the top would have been the recommended method, cutting 3 inches off the stem might slow down its growth temporarily, but it is unlikely to kill the plant altogether. Avocado trees are generally resilient and can recover from minor setbacks.
To give it the best chance of survival, make sure you choose a suitable pot with good drainage, use well-draining soil, and water it adequately. Place it in a sunny spot and provide it with regular care. With time, your avocado plant should resume growth and continue to thrive. Keep an eye on it, and don’t forget to consult reliable sources for future instructions. Good luck with your avocado tree!