Making a Chunk Candle
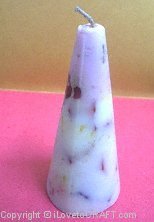
Making chunk candles is a fun activity for all ages. A unique technique using wax chunks of different colors gives the finished candle a beautiful texture and look. They make a refreshing alternative to the usual pillar candles. Follow these step-by-instructions and make your own pretty chunk candles to gift or keep.
** It is assumed that the reader has a basic knowledge of preparing the candle mold by spraying oil and wicking it and also for setting and removing the finished candles from the mold. Anyone who has made a pillar candle before will find this project very easy to follow.
What You Need:
- Wick
- Paraffin Wax
- Candle Mold
- Candle dyes in various colors
- Shallow Tray
Directions:
1. First you will need to prepare chunks. You can use leftover chunks from other candle projects. Or you make new ones by melting wax, adding color and allowing to set in a shallow pan. You can use either single-colored or multi-colored chunks.
2. Prepare the mold by spraying oil and wicking it. Then fill the mold with chunks.
3. Melt (un-dyed) wax and add to the mold. Allow to set completely.
4. When completely set, remove from mold.
Note: You can make different types of candles by altering the number of colors and chunks used. You can choose all your chunks to be of the same color or different colors. The color of the ‘filler wax’ can also be white or any other color that you choose to have.
You can also cut out all your chunks in similar shapes or keep mismatched ones.
The Author:
Craft Project provided by http://www.iLovetoCRAFT.com. Visit us for more craft ideas and free patterns.

