Make a Rustic Reclaimed Wood Tray
Nothing says summer gatherings quite like a sun-drenched, well-set table. Whether you are hosting a lively backyard barbecue or a quiet evening under the stars, the perfect centerpiece bridges the gap between functional serving ware and effortless style.
Instead of buying a mass-produced store piece, you can breathe new life into forgotten materials. Crafting a centerpiece tray from old fence boards or pallet wood is a rewarding, beginner-friendly weekend project. It adds instant warmth, texture, and a beautiful story to your table landscape.
Reclaimed Charm
Before diving into the construction, it helps to understand why reclaimed wood is the star of the show. Weathered fence pickets and shipping pallets have spent years developing deep grooves, unique grain patterns, and a natural patina that cannot be replicated in a factory. By turning these rough edges into a refined tray, you create a striking contrast that feels both rugged and sophisticated.
Gather Your Materials & Tools
You don’t need a master woodworker’s workshop to pull this off. Here is everything required to build a standard 24″×12″ centerpiece tray:
- Reclaimed Wood: 3 to 4 pieces of old fence boards or pallet wood (cut to your desired length).
- Support Cleats: 2 smaller strips of wood (about 1″ wide) to hold the base together underneath.
- Sandpaper: 80-grit (for rough shaping) and 220-grit (for a smooth finish).
- Fasteners: 1-inch wood screws or a brad nailer.
- Finishing Touches: Wood stain, whitewash, or clear polycrylic sealant.
- Hardware: 2 cabinet handles or vintage drawer pulls with matching screws.
- Safety Gear: Dust mask, safety glasses, and work gloves.
Step-by-Step Instructions
+-------------------------------------------------------+
|  [Handle]                                   [Handle]  |
|  ===================================================  |
|  ||                 Plank 1                       ||  |
|  ||-----------------------------------------------||  |
|  ||                 Plank 2                       ||  |
|  ||-----------------------------------------------||  |
|  ||                 Plank 3                       ||  |
|  ===================================================  |
+-------------------------------------------------------+
Step 1: Source and Prep the Wood
Safety first! Check your pallet wood for stamps. Look for an “HT” (Heat Treated) stamp, which means the wood is safe to use. Avoid pallets marked “MB” (Methyl Bromide), as they have been treated with harsh chemicals.
Once you have safe wood, use a crowbar or pry bar to carefully separate the planks. Pull out any old, rusty nails with the back of a hammer or pliers.
Step 2: Cut to Size
Decide on the dimensions that best fit your dining table. A standard, versatile size is 24 inches long by 11 to 12 inches wide.
- Cut 3 or 4 planks to your identical target length (e.g., 24 inches).
- Lay them side-by-side to measure the total combined width.
- Cut 2 under-mount support cleats that match this total width exactly.
Step 3: Sand Away the Splinters (But Keep the Character)
Because this tray will live on a dining table, you want it to be smooth to the touch without erasing its history.
- Start with 80-grit sandpaper to knock down major rough spots, splinters, and sharp edges.
- Switch to 220-grit sandpaper for a soft, touchable finish.
- Tip: Leave the deep nail holes, knots, and weather grooves intact—that’s where the magic lives!
Step 4: Assemble the Base
Flip your top planks face-down on a flat work surface, aligning their edges tightly. Place your two support cleats perpendicular to the planks, about 2 inches inward from each end.
Using wood glue and your 1-inch screws, secure the cleats into the bottom of each plank. Make sure your screws aren’t long enough to poke through to the top of the tray!
Step 5: Stain and Seal
Wipe away all sawdust with a damp cloth. Now, choose your aesthetic:
- Rich & Cozy: Apply a dark walnut or espresso wood stain, wiping off the excess immediately to let the grain peek through.
- Coastal Breeze: Mix white acrylic paint with water (1:1 ratio) to create a whitewash, brush it on, and dry-brush it off for a beachy look.
- Pure & Natural: Skip the pigment and apply a clear, matte polycrylic sealer to protect the wood from spills while preserving its natural, weathered gray tone.
Step 6: Add the Hardware
Once the sealant is completely dry, flip the tray right-side up. Measure and mark the center points on the two shorter ends. Drill pilot holes and screw on your chosen handles. Heavy black iron pulls give an industrial farmhouse vibe, while brushed brass handles lean more modern-eclectic.
Styling Your Tray for Summer
Now comes the best part: bringing your creation to life. The beauty of a flat centerpiece tray is its incredible versatility. As the weeks change, your styling can change right along with them.
- The Wildflower Meadow: Line the center of the tray with four or five clear mason jars. Fill them with mismatched, fresh-cut wildflowers like daisies, cosmos, and Queen Anne’s lace for an effortless, hand-picked look.
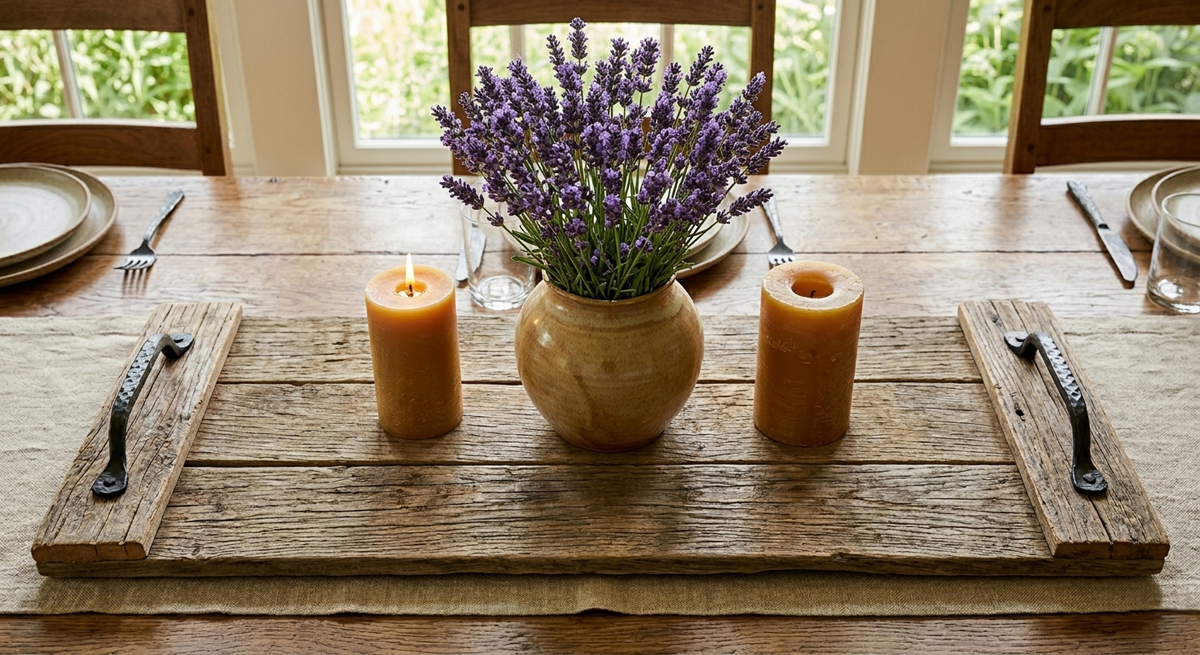
- The Midsummer Glow: Group varying heights of white pillar candles directly on the wood. Nestled among eucalyptus branches or olive stems, the ambient candlelight will bounce beautifully off the textured wood grain during late-night patio dinners.
- The Farmstand Harvest: Pile the tray high with seasonal fruits like bright lemons, limes, or green apples. It adds a brilliant pop of organic color that feels incredibly fresh, practical, and inviting.
Tip: To protect your dining table from scratches, stick small adhesive felt pads to the four corners of the under-mount cleats beneath the tray! 🙂
Pioneerthinking.com: Ingredients for a Simple Life. Insights from a seasoned professional rooted in country living, with 28 years of horticulture expertise and over two decades of practical experience in homesteading, natural beauty and cosmetic creations, natural health, cooking and creative living.
Photo. Gemini


